OpenHAB & HestiaPi Classic, via MQTT
(This is part 3 of my home automation blog series. See the automation category for the whole set)
So far, we’ve got HestiaPi Classic speaking MQTT but nothing is really listening to it, or talking back. Time to fix that!
Meet OpenHAB
I’m not going to pull punches here, OpenHAB is a bit of a beast. It’s hugely flexible, but as with most systems, that flexibility comes at the cost of bit of a learning curve. Fortunately, I’ve got your back :)
At it’s core, OpenHAB just an event handler. Sure, it’s sophisticated, and has a ton of features I haven’t even started looking into yet, but that’s it’s main function - events happen, and it’s OpenHAB’s job to notice and act accordingly. In this post, we’re going to get OpenHAB set up to talk to HestiaPi Classic - to report the current data, and send control events back.
Installing OpenHAB
OpenHAB does have an impressive docs site, and there’s a ton of content there. I’ve found it a helpful resource for sure, but for this quick walk through, we’ll use their Linux install guide since it’s the most generic, but note there are many other options including a dedicated Raspberry Pi distro (openHABian), a Docker container, and even packages for QNAP and Synology NAS devices. Pick what works for you.
I’ll not repeat the install steps here (that’s a sure way for me to have out-of-date-info on my blog :P), so from here on out I’m going to assume:
- You’ve got OpenHAB installed on your host (mine is called ‘openhab’)
- That OpenHAB is running (check
ps axffor Java OpenHAB processes) - That your broker from Part 2 is working (mine is also on ‘openhab’)
- That your HestiaPi Classic is on-line and reporting data to the broker
The OpenHAB community is full of helpful people if you get stuck with general install issues.
Configuring OpenHAB
OpenHAB’s configuration is (largely) done in config files. For a Linux install,
that’s /etc/openhab:
tree /etc/openhab2 -L 1                                                                                      • ~
/etc/openhab2
├── html
├── icons
├── items
├── persistence
├── rules
├── scripts
├── services
├── sitemaps
├── sounds
├── things
└── transform
The directories we care about are items, sitemaps, and rules, and we also
care about bindings which aren’t directly visible here. Let’s break that
down:
OpenHAB Bindings
Programmers among you will probably have guessed already… Bindings are ways to “teach” OpenHAB how to speak to a certain piece of hardware or software. There are many, many bindings available (e.g. Hue, ChromeCast, Plex, Asterisk, etc.) - but we’ll be wanting the MQTT binding (see later) so we can talk to the HestiaPi Classic.
OpenHAB Items
Items are the workhorse of OpenHAB - they store the state of various systems, and thus are what cause the rules to fire when state changes. Think of them as the virtual layer that represent your actual stuff - that light switch, this temperature sensor, and so on.
OpenHAB Sitemaps
Sitemaps are the UI code that allows you to define how your items are displayed. It’s pretty flexible, and can even do things like conditional hiding of elements.
OpenHAB Rules
Rules are the underlying glue of the event handler. Whenever something changes, it will trigger the rules listening for that, and act accordingly. They’re based on Xbase / Xtend which as a non-Java person has taken a little getting used to, but happily we don’t need anything too complex here.
Getting Hestia_MQTT working in OpenHAB
Right, those are the concepts - let’s put it to work. First we’ll need the MQTT
bindings. Hit up the OpenHAB web console on http://openhab:8080 and select
the PaperUI. Then go to Add-ons and Bindings and then scroll down to the
MQTT binding. Click install to, well, install it ;)
That’s not all though. Referring to the MQTT Binding
docs you’ll see we
have some config to do in /etc/openhab2/services/mqtt.cfg. The only line you
really need to set is the URL, but I’ve set the client ID just so I know what
it is:
openhab.url=tcp://localhost:1883
openhab.clientId=openhabserver
Save that, and magically OpenHAB can now speak MQTT - hooray!
MQTT Items
OK, not quite ‘hooray’ yet - we can speak the MQTT language know, but we don’t
have anything to listen to! Lets fix that. Open up
/etc/openhab2/items/hestia_mqtt.items in your favourite editor, and drop this
in (note I’m using the hostname openhab for the broker and hestia for the
channel prefix, see part 2 if you’re
unsure):
Number hestia_temp_c "Temperature [%.1f °C]" <temperature> {mqtt="<[openhab:hestia/status/temp_c:state:default]"}
Number hestia_setpoint "Target [%.1f °C]" <temperature> {mqtt="<[openhab:hestia/status/setpoint:state:default]"}

String hestia_heat "Heat Mode: [%s]" <fire> {mqtt="<[openhab:hestia/status/heat:state:default]"}
String hestia_heat_boost "Heat Boost" <fire> {mqtt="<[openhab:hestia/status/boost_heat:state:default]"}
String hestia_heat_boost_time "[%d mins]" <fire> {mqtt="<[openhab:hestia/status/boost_heat_time:state:default]"}

String hestia_water "Water Mode: [%s]" <self_water> {mqtt="<[openhab:hestia/status/water:state:default]"}
String hestia_water_boost "Water Boost" <self_water> {mqtt="<[openhab:hestia/status/boost_water:state:default]"}
String hestia_water_boost_time "[%d mins]" <self_water> {mqtt="<[openhab:hestia/status/boost_water_time:state:default]"}
Lets break that down a bit. As per the docs, Items take this form:
itemtype itemname ["labeltext"] [<iconname>] [(group1, group2, ...)] [["tag1", "tag2", ...]] [{bindingconfig}]
So for line 1, we’re saying it’s a Number, it’s itemname is hestia_temp_c,
it’s label is the number with some text around it, it should use the
temperature icon, and the binding config is from MQTT.
For the binding config, the form is
mqtt="<direction>[<broker>:<topic>:<type>:<transformer>],...
So direction < means we’re reading a value in, the broker is a hostname
(openhab in this case), topic is the MQTT channel, type is either state or
command and transform allows us to alter the data (which we don’t do, so
they’re all default). So hopefully you can now see that we’ve defined the 8
values we wish to read from the HestiaPi Classic.
Save that file and then check the OpenHAB logs, and you should have a happy sight:
==> /var/log/openhab2/openhab.log <==
2017-04-25 22:01:58.315 [INFO ] [el.core.internal.ModelRepositoryImpl] - Refreshing model 'hestia_mqtt.items'

==> /var/log/openhab2/events.log <==
2017-04-25 22:03:02.544 [ItemStateChangedEvent     ] - hestia_temp_c changed from 20.062 to 20.375
... and so on...
OK, that’s worth a hooray! But we still need control and to view it in the UI…
Sitemaps
So we can see the MQTT data in the logs.. great? Let’s add some UI. Edit
/etc/openhab2/sitemaps/hestia.sitemap to have this content:
sitemap hestia label="Hestia"
{
	Frame label="HestiaPi" {
		Text item=hestia_temp_c
		Setpoint item=hestia_setpoint minValue=10 maxValue=30 step=0.5
	}
	Frame label="Heat" {
		Text item=hestia_heat
		Switch item=hestia_heat_boost mappings=[ON='On',OFF='Off']
		Text item=hestia_heat_boost_time label="Heat Time Remaining" visibility=[hestia_heat_boost==ON]
	}
	Frame label="Water" {
		Text item=hestia_water
		Switch item=hestia_water_boost mappings=[ON='On',OFF='Off']
		Text item=hestia_water_boost_time label="Water Time Remaining" visibility=[hestia_water_boost==ON]
	}
}
Nothing too complex here - just Type, ItemName, and some minor tweaks. Note how
the item names match the hestia_mqtt.items file - if you changed any, change
them here too.
The mapping and visibility options are handy, as they allow us to alter
and/or hide elements are required. In this case the mappings just tidy up the
all-caps responses from HestiaPi Classic. The visibility tags are handy though
- there’s no point displaying the remaining boost time if the boost is not
active, so we hide it if it’s not boosted. Neat!
OK, last trick. Head back to the Paper UI (http://openhab:8080) and go to
Configuration, then Services and BasicUI. Set the default sitemap to
hestia (which must match the filename and map name on line 1). Save, got back
to (http://openhab:8080) and select BasicUI and you should get something
like this!
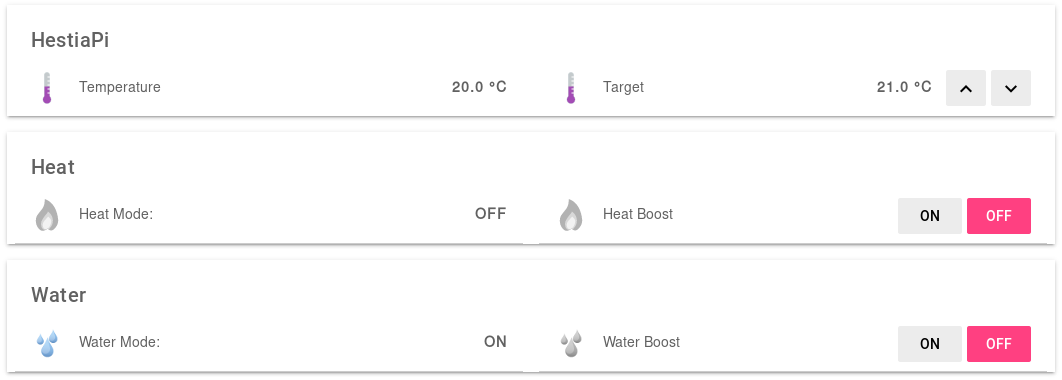 BasicUI
Rules
The eagle-eyed among you will have noticed that the Heat Boost and Water Boost
Sitemaps are configured as Switches - but the MQTT Item config is a state
(direction <). What gives?
We’re going to use a couple of rules to trigger the boosts, and also to set the
temperature setpoint. Open up /etc/openhab2/rules/hestia_mqtt.rules and put
in this content:
rule "Hestia Water Boost"
when
  Item hestia_water_boost received command ON
then
  publish("openhab", "hestia/boost_water", "30")
end

rule "Hestia Heat boost"
when
	Item hestia_heat_boost received command ON
then
	publish("openhab", "hestia/boost_heat", "30")
end

rule "Hestia Set Temperature"
when
  Item hestia_setpoint received command
then
  val temp = "" + hestia_setpoint.state
	publish("openhab", "hestia/set_temp", temp)
end
So this is nothing too scary I hope - we monitor the state of the three Items
we care about, and when the Sitemap causes changes (that is, when someone
clicks them), we take an action. Publish is a method available to us via the
MQTT binding, so we just need to send the command. For now, I’ve hardcoded the
boost to 30 minutes - once I figure out pop-ups or something, I’ll update you!
The val temp line is a hack due to the fact that I suck a type-casting in
Xbase - without it I get errors about trying to automatically cast temp to a
String in the publish method. Any pointers are welcome :)
So, save that, and then try the Boost button. You should see these things logged:
==> openhab:/var/log/openhab2/events.log <==
2017-04-25 22:35:13.928 [ItemCommandEvent          ] - Item 'hestia_heat_boost' received command ON
2017-04-25 22:35:13.931 [ItemStateChangedEvent     ] - hestia_heat_boost changed from OFF to ON

==> hestiapi:/var/log/hestia_mqtt.log <==
[2017-04-25 22:35:15] - Heating boost set to 30 [code: 200]
Most of all, you should see the boost light come on! Test the other buttons too!
Conclusion
If all went well, you should now have control of HestiaPi Classic from OpenHAB. The above doesn’t get you very far, since it really just replicates the standard HestiaPi Classic web UI - but it does open the door to further integration. When I have more things integrated, I’ll blog again - but for now, feel free to ask questions over in the HestiaPi community thread for this blog post. I’ll be sure to help out!